Old point-and-click film cameras like the famous "viv" and others are great, but there are a couple of obvious problems with them.
- There is no exposure control: no alternate shutter speeds or apertures
- There is no focus
All this can be easily changed with a very very easy mod. It will turn your cheap toy camera into something quite capable.
All you need do is add a filter ring.
Filter threads
A filter ring is just a threaded ring of metal taking a filter in one of the standard sizes. The standard sizes are all metric. Common ones are 46, 49, 52, 55, 58, 62... This means the diameter in mm of the thread. Actually another dimension is required: the distance the thread travels when it turns once round. For filters this is almost always 0.75mm. Thus you see filter threads written M49x0.75. (The M is for metric.) This is the same system as for the famous M42 lens mount. The M42 lens mount is in fact M42x1 as one turn advances the thread 1mm. In contrast the T2 lens mount is M42x0.75. That's why T2 lenses don't fit M42 cameras directly: an adapter is required. Unfortunately I see lenses sold on the bay as "M42" when they are in fact "T2".
To get or make a filter ring you need to take threaded a part of a lens or filter and remove all but the ring. In particular remove the glass. The first time I did this I smashed the glass because I couldn't see how to do it. Then it became clear. (No pun intended:) Some filters have a fine slim threaded ring that holds the glass in place and this can actually be unscrewed with something fine like a pair of jeweller's screwdrivers. Some have a sprung metal loop that has to be prised out. None I have seen is attached with glue.
Alternatively you can buy a stepping ring which is like a filter ring but with different threads on each side. Get one with the right size (M49, M52 etc) and right gender (male, female) that you need on one side. The other side doesn't matter. A step-up 49-52 ring has a male 49mm thread to screw into the front of the lens and a female 52mm thread to accept a 52mm filter. A step-down ring 52-49 has a male 52mm thread to screw into the front of the lens and a female 49mm thread to accept a 52mm filter.
Simply glue your ring on to your camera with epoxy adhesive. (The sort that comes in two tubes that you have to mix.) It helps if you scratch any shiny surfaces hard with a sharp knife or screwdriver first to ensure they will take the glue. Leave to set overnight and you are done.
For example
here I used a 37-46 step up ring, and
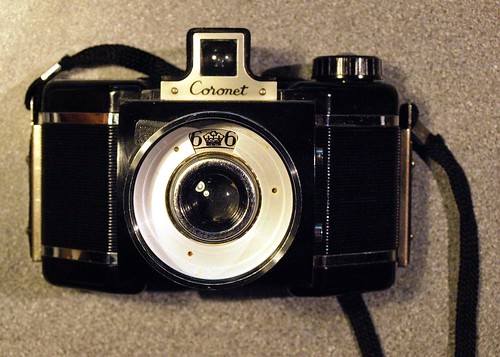
where I used a 52mm ring salvaged from a broken camera
What to do with your modified camera
There are two or three main benefits of using filters. First is exposure control.
- You know what speed your film is. You know (or can probably find out from the web) what the fixed shutter speed and aperture of your camera is. So with a light meter you will know how many stops your picture is going to be over exposed. Don't let it happen! Use a ND (neutral density filter) to stop the light by 1 2 or 3 stops (using a ND2, ND4 or ND8 respectively). Or (with care, getting the orientation right) you can use a polarising filter.
These cameras work so much better when the the light is just right and the film is being used to its best.
If you are using black and white film...
- Try a coloured filter to get some different tonal effects!
For example an orange or red filter will make blue sky darker leaving white clouds white. If you also get the exposure right, a red filter can make deep blue sky almost black. A green or yellow-green filter is great for making leaves lighter.
- Use a close-up to focus on nearby objects!
More on this in a moment.
If your filter ring is large enough, as it probably is, you can easily stack filters to get all these effects. If you are using black and white film your coloured filter will change the amount of light too, so if yuo are desperate or happy with the colour, you can used a red or orange filter like an ND8 or ND4 filter.
Using close-up lenses
Close-up lenses are one of the most common accessories and least understood. For my first serious camera I had a close up lens and a table of values of the form "with close-up +1 to focus at X set lens to Y". This is tricky and the table is nearly impossible to carry in one's head, or calculate on the spot, and is always left at home when you need it.
But the actual estimations you need are easy.
Let's suppose your fixed focus lens will "focus" from perhaps three metres to infinity.
- A +1 lens is (as we discussed already in this blog) a lens with focal length of 1 metre. So the same lens with the +1 adapter added will focus up to but not much beyond 1 metre. It will focus from something closer than 1 metre to 1 metre itself, corresponding to the range 3 metres to infinity. In fact, with +1, 3 metres corresponds to 0.75 metres (I just did the calculation) so with +1 you get 0.75m to 1m.
- A +2 lens has focal length of 500mm. So your lens with the +2 adapter added will focus up to but not much beyond 1/2 metre. It will focus from something closer than 1/2 metre to 1/2 metre itself, corresponding to the range 3 metres to infinity. In fact, with +2, 3 metres corresponds to 3/7 metres so with +2 you get 3/7m to 1/2m.
And so on. I can't calculate any more. But I don't need to. I just need to know that +3 focuses up to 333mm and +10 focuses to 100mm. (These are distances from the close-up lens to the object, not the camera to the object.)
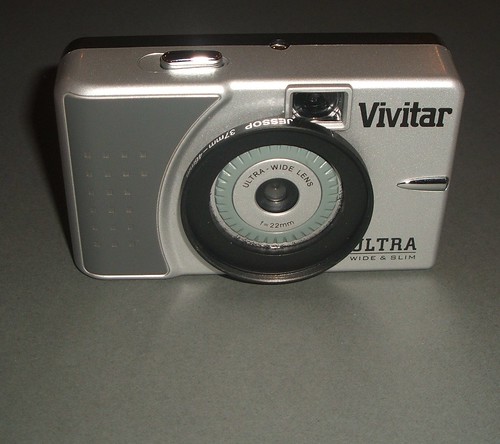
Let's see this in action. The following were taken with the Vivitar Ultra Wide and Slim (a really great toy camera with a wide 22mmm lens) with close-up filters focusing close and throwing infinity out of focus


I hope you agree that these are much more interesting, with better focus close-up - but mainly because of the lack of focus at infinity. Large depth-of-field isn't everything!
No comments:
Post a Comment